

After using and working with HubSpot for over two years now, I can gladly say that I have discovered a few ways to make both my job easier and more efficient — and wish my younger self had been aware of a few HubSpot features earlier.
So, I decided that sharing what I've learned over the years to the digital marketing world would be useful to others like me who are starting out in the HubSpot Marketing Platform but may feel overwhelmed or confused by the influx of HubSpot information.
Here are the top ten HubSpot tips and tricks that I have picked up over the last two years, from sharing pages on social media to automating relevant emails to potential customers — and more.
1. Accelerated Mobile Pages (AMP)
Accelerated Mobile Pages are something Google created in order to assist in page load time since they changed their search algorithm (again) to prioritize fast loading sites and penalize slow ones.
This is possible because when your page is an AMP page, it prioritizes content over other scripts, like unnecessary features. Focusing on the content like text while limiting external styles or animations allow your page to load almost instantaneously.
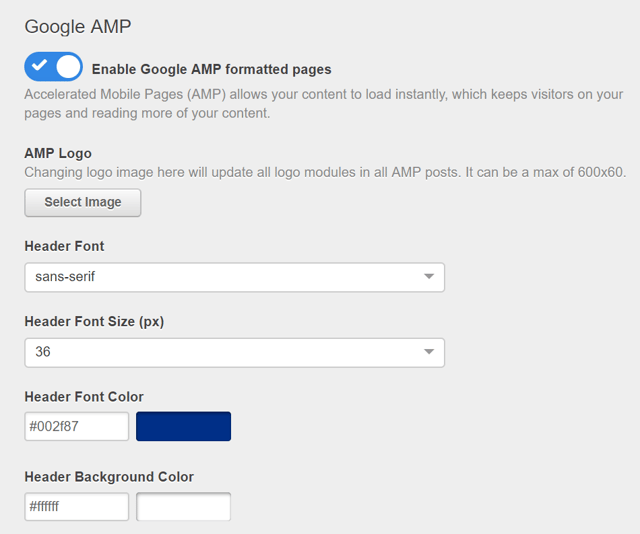
With HubSpot, we are able to make all of our blog posts in AMP posts with the check of a single box. Doing so increases the load speed of all of our blog posts, satisfying both Google and whoever is trying to view our blog.
Using HubSpot, we can also set the default font colors, size, and family in order to boost load time. These default fonts are all web-safe fonts, meaning no call is being made to import any outside fonts that could slow load time.
2. Tinypng for Optimizing all Images
Optimizing images for blog posts and websites have more impact on your page load time than you might think. The time it takes to load your site will affect whether or not someone will even give your site a chance and view your content. Sites that take more than two seconds to load should consider looking into optimizing their website.
One big way to optimize your website is to optimize all images. Many CMS's will automatically do it when you upload an image, but I have begun to take a few extra steps to make it easier for all parties. Many of our images, unfortunately, come from iStock. These photos usually come in the dimensions of 2,122px by 1,416px, which are much larger than images on your site need to be.


As a reference, these are the exact same images. The difference, is that the first one is 152KB, whereas the second one is only 46KB. This is a 70% decrease in the size of the file, and if you can spot a difference in the quality, I'll buy you a coffee.
Unless it's a banner image, I always resize the image down to 1080px wide. Doing so reduces the overall size of the image. After this, I go to tinypng.com and compress the image to further reduce it. You should never put an image on your site that's more than 1Mb. Most of the images I put into HubSpot are no bigger than 300Kb and look just as good as a 4Mb photo of the same dimension. Optimizing your images improves page load time dramatically and is worth reviewing your own site to see what your image sizes are.
3. Email Deliverability and The Error Codes
As frustrating as email marketing tends to be, it still plays a vital role in the overall marketing strategy of many industries. Not only is it impossible to get emails to display correctly for everyone, it is also extremely hard to deliver your emails to 100 percent of your sending list.
This is why database cleaning and email deliverability analysis is extremely important. I have had to work extensively for one of our clients in terms of cleaning their database and ensuring only qualified leads get their emails. While it can be time consuming, the key is to start early and make sure you're cleaning your email lists on a regular basis.
In Hubspot, for example, we can see a list of all the people who we attempt to send an email to, those who failed to receive, and those who clicked a specific link in that email.

My focus, most times, is seeing which people failed to receive the email. Many times, it is because they either don't exist any longer or their email server is blocking the email. HubSpot allows us to dig into each recipient of the email and learn why they did or did not receive the email. In particular, look for contacts who have Hard Bounced, and under that, those who have an error code of UNKNOWN_USER (they don't exist) or MAILBOX_FULL (they likely no longer use that email). These people tend to fall into the category of those whose email addresses are no longer valid and are usually safe to delete from your database.
For those who might be salvageable (i.e., Soft Bounces and certain Hard Bounces), look for codes like IP_REPUTATION, CONTENT, SPAM, and POLICY. These codes mean that your email might have had some fishy content that email clients might have wrongly flagged. You can resolve this issue by contacting recipients and asking them to whitelist your sending domain and then by adding your address to their recipient’s address book.
This helps train their email client to recognize your emails and ensure they keep receiving them. You can learn more about requesting your contacts to whitelist your sending domain here.
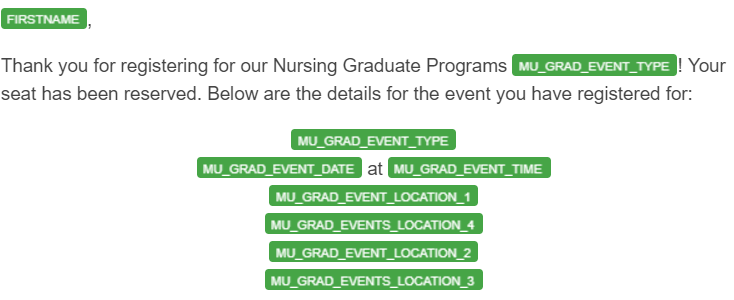
4. Premium Content and Email Event Personalization Tokens
Premium content is a main driving force behind the Inbound marketing methodology. After producing lots of content, it can get quite tedious to create automated emails for each piece of content.
So, one strategy I began to implement was instead of creating a follow-up email for each piece of content, I added some new hidden fields to each content form. These fields included information like the name and URL of the guide. By doing this, I was able to design a single email to send to everyone who submitted a form for a guide.
In the actual email, I would just swap the name of the guide and the URL for it with personalization tokens. Now, every time someone fills out a form for an email, they are all sent the same email with personalized information based on the form they filled out. (This same method can be used for events as well.)
For example, for higher education, we assign event information as hidden form fields to each form. This way, when we create the follow-up email, the email event information will always be up-to-date, and we don't need to create a new email for every new event.
5. Correctly Interpreting HubSpot Reports
The brains and brawn of HubSpot are its Reporting and Nurturing capabilities, respectively. When it comes to Reporting, Hubspot gives marketers the ability to see how their pages are performing. We can track visits over time, the original source of each visitor, which domains generated the most contacts, and how we can optimize each page for increased performance.
After analyzing countless accounts, I realized that HubSpot reporting can sometimes give some confusing numbers when it comes to how many contacts each domain is generating.
For example, in the Sources Tool in HubSpot, you can view how your website traffic is performing based on all the domains connected to it, or even just specific ones. We have run into this issue before: When we view the all domains contacts count, it is lower than when we choose a specific domain. Now how can that make sense?
After consulting with HubSpot on this via email, I received an answer that explains the difference in numbers we keep getting.
"The All Domains sources report will show the contacts Original Source for the first time they were created as a contact. However, when we filter by the specific subdomain, this will show the source for how they first came to that subdomain. … For example, if I was created from an import, and later I filled out a form then the analytics data is not able to see the pages that I've viewed. If the first time I ever came to your website was from Organic Search after I was created from Offline Sources; then I'd be bucketed under 'offline sources' in 'All Domains' but as 'Organic Search' when filtering by subdomain." [Edited for word flow and accuracy]
While this answer explains the strange numbers, it is not made clear anywhere that this is actually how HubSpot counts visitors, and only after consulting technical support was I able to get a clear answer and understanding.
6. Smart Call-To-Action (CTA) and Form Fields
HubSpot allows the creation of various smart content. This smart content changes depending on user activity and allows for various levels of personalization for every visitor to your site. While this is a topic that I could dive deep into, for now, I just want to focus on smart CTA's and form fields (also known as progressive profiling).
Smart CTA's can be set up in HubSpot very easily and can be segmented based on device type, a specific list, their lifecycle stage, referral source, etc. All of these options allow me to create CTA's that will target different people with different offers.
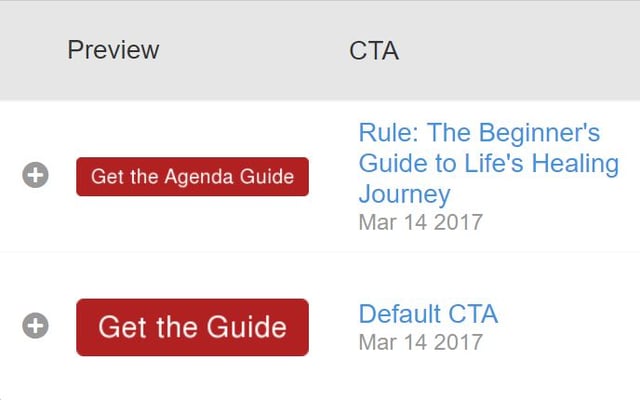
This way, people will only see CTA's that are relevant to them, thus increasing click rate and then increasing the amount of qualified leads. Another use of smart CTA's is to offer contacts the same thing but change the look and feel of the CTA. Something like changing the color or wording on a CTA can drastically increase (or hurt) your results.
In a similar fashion, progressive profiling in forms allows us to capture more relevant and specific information about each person that fills out a form. In HubSpot, I can make form fields smart, meaning if we already have their first name, email, and what degree they want to pursue, I can queue up other fields like current level of education and when they want to start school. All of this will replace already known fields automatically, meaning people won't get tired of filling out the same form fields every time, and we get more detailed information about each contact.
7. Facebook Developer and Twitter Card Validator (For Landing Pages)
Facebook and Twitter have given marketers the tools to ensure that the image they want to appear when someone shares the URL of the pages actually appears. For Facebook, you simply need to use the Facebook Developers Debug tool, debug the URL, and scrape for new information. For Twitter, it is a similar process. You just need to go to the Twitter Validator page and validate the card.
When it comes to marketing on social media platforms like Facebook and Twitter, research says that adding an image to your posts increase likes and engagement. In hard numbers, Facebook posts gain 2.3x more engagement when an image is added, and tweets received 150 percent more retweets when an image accompanies it. When it comes to HubSpot blogs, adding a featured image is easy and is used in the actual blog, the notification email and on all social media platforms.
When it comes to landing pages, however, it gets a little trickier.
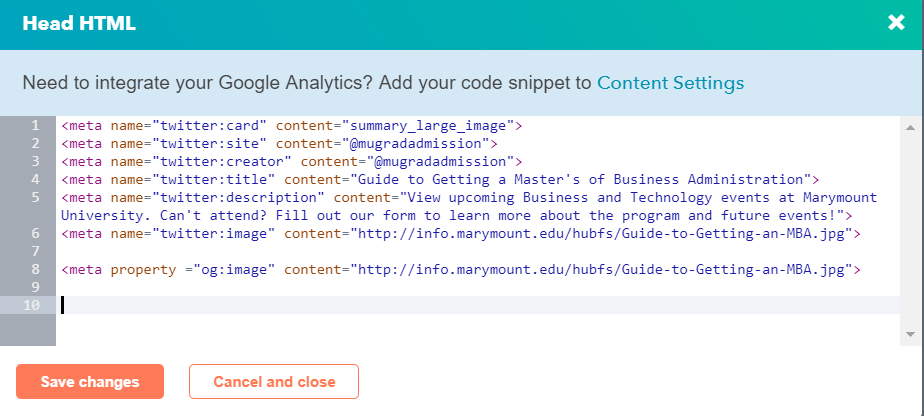
In order for the images to actually appear when sharing landing pages, you need to add some HTML snippets to the head of your page. For Facebook, it's as simple as putting the following line: <meta property="og:image"content="url-of-the-image"/>
For Twitter, it gets a little more complicated, but you can use the code below and switch out the required information depending on what is relevant for you:
<meta name="twitter:card" content="summary_large_image">
<meta name="twitter:creator" content="@your_handle">
<meta name="twitter:title" content="A Descriptive Title">
<meta name="twitter:description" content="A Concise Summary">
<meta name="twitter:image" content="url-of-the-image">
In the end, your page HTML head will have something that looks like this:
After these snippets are added, you just need to run it through each validator, and you're good to go! Now, when you share the URL for that landing page, the image you want will appear with the shared information.
8. Keeping URL's Clean in the File Manager
This is probably one of the more overlooked and ignored tips that I know of. On top of making sure that your file manager (where HubSpot stores all your photos and documents) has a clear hierarchy, it's important to ensure that everything you upload has a logical and well-formed URL.
Many times we have linked a URL to a CTA and expect it to work, only for it to either break or just not work as we expected. This is because the name of the file or photo is encoded into a URL, which has different functionalities based upon different symbols.
For example, I would highly suggest not using the & symbol in a file when it will be used as a URL, as well as converting all spaces into dashes before upload. If you have ever looked in a URL and saw a bunch of %20's or +'s, it's because whoever uploaded left a number of spaces in there (spaces are encoded into %20 or + automatically). Not only does this look unprofessional, but it could have unforeseen consequences in terms of SEO and functionality if you are not careful.

9. Flexible Columns for Landing Pages
This is more on the technical side of things, but I want managers as well to know HubSpot capabilities so that they know what is and isn't reasonable. I'll try to make this as generic as possible since people might not be familiar with HubSpot's Design Manager.
Essentially, when creating a template in HubSpot, it can be as easy as dragging and dropping modules, ranging from regular text to custom HubL modules (I'll cover HubL another day). When you create these templates and then build a page based on them, they can be pretty rigid. Flex columns are a way to add some flexibility to your page.
Let's say you have a simple two column template, with text on the left side and a form on the right side. If you make a landing page based on that template, you would only be able to put text on the left side and a single form on the right side. In order to add anything else, you would have to change the template, potentially affecting a plethora of other pages using that same template.
In order to make your template more flexible, add some flex columns below the form and text module. Now, when you are in the landing page editor, you can add as many different modules as you want to the page, without affecting other pages.
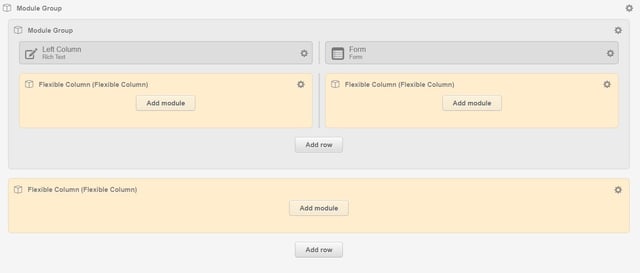
There is a slight caveat to using flex columns. If you ever use a page that utilizes flex columns but then attempts to change to a template that doesn't, you will lose all the content that you originally had in the flex column.
10. Lead Flows
Lead flows are a fun little feature that HubSpot gives its marketing customers. They are essentially easy-to-use popup forms that can be of great benefit to your inbound marketing strategy. If you're familiar with Inbound marketing then you might think that popup forms go against everything Inbound stands for. You're partially right — and here's why.
You should only use lead flows during moments of relevance and with correct intention. Otherwise, you will just be annoying every visitor that comes to your page (looking at you Forbes, making me disable Adblocker). Google even stated that they will penalize sites with annoying popups.

The key to staying on Google's good side? Make your lead flows (popups) relevant to the user and enhance their experience. Don't make a popup that takes them away from what they want: Be user-centric!
While there are many benefits and tools that come along with the HubSpot platform, these 10 tips are the ones that have made my life easier since discovering and implementing them, and they have increased the success of our marketing efforts for both our nonprofit and higher education clients.
Interested in HubSpot? Get a free demo today and see how it can empower your institution and begin driving leads further down the enrollment funnel.